Those Are Regulars!

Those Are Regulars!
Scott Leading the First Brigade

Wednesday 26 December 2018

Battle of North Point

The Battle of North Point, 12 September 1814

The Terrain, Research, Orders of Battle, Scenarios and Game Timeline

The Terrain


 Probably the best Baltimore area campaign map that I have found (U.S. National Park Service).


 The left half of the wonderfully panoramic display of the North Point Battlefield by Richard Schlecht from In Full Glory Reflected . Note the RMA rockets firing (left middle) correctly portrayed on a ladder launching frames and just above it Boulden Farm, the roads, fence lines, swampy area (fore ground bottom). The American line are in the right upper corner area.

Both of these 2d maps were most useful in portraying the battlefield with a view to accurately modelling the table top terrain.

The right side of the 2D map with the Bread and Cheese Creek emptying into the Back River (below). The British 4th Foot are emerging from the swampy area to attack the 51st Maryland Regiment, which forms the American left flank.

Note that the above view is from the opposite side in relation to the tactical maps below.

 This tactical map of North Point is taken from the Maryland War of 1812 site. As you can see by my the measurements along the edges, I used this map to lay out the table top terrain. This map was useful to delineate the roads, rivers, inlets, bridges and buildings. I used a one inch equals 20 yds. to convert the distances from the map to the table top battlefield.


This is a player map converted from the above tactical map that shows wooded areas fence lines etc. plus the American no go area for British deployment (bottom right corner) for each side's use. The American player has the option to deploy both of the rifle Battalions any where outside of the two foot British deployment area (hidden known to GM and activated when British come within 6") . The remainder of the American Army can be place no closer than Boulden Farm.


Building the Battlefield Terrain

 The table consists of several six foot tables, which are covered with interlocking two foot square foam pads and then covered with two six foot wide rolls of green felt.


Note the two tape measures that are used in conjunction with aforementioned tactical map to accurately place terrain features. In this the longer stream is Bread and Cheese Creek.

Now the other water features are added along with the major roads and two bridges. The road in the distance leads to British Landing area at North point and the road below left corner leads to Baltimore.  Unfortunately, I neglected to take photos of the additional terrain features such as building fences trees etc.  However, one see the full terrain effect in the photos of the first session.

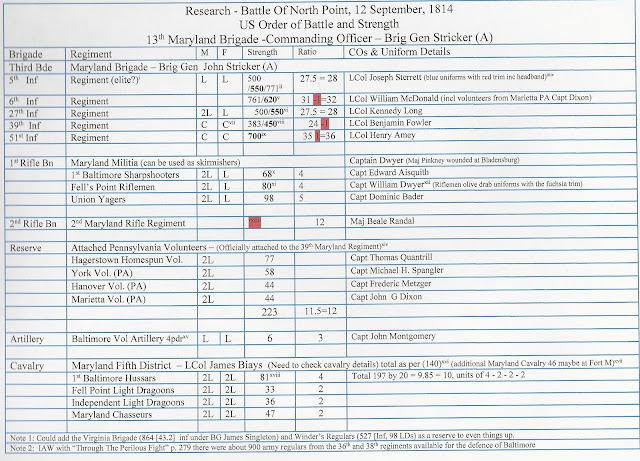
The Orders of Battle and Research

 The story of the research is contained within the Foot Notes.  In terms of the unit strength under the ratio column (20:1) I have rationalized numbers to fit four figure stands. This results is pluses and minuses but evens out over all.


Game Orders of Battle and Scenario Objectives plus Restraints and Options

Note: I added a regular (B Gen Winder) and a small Virginian Brigade ( B Gen Singleton) to even up the units on each side. These brigades will arrive randomly via D6 roll based on the Time Line Chart (below). These Brigades were not present at North Point. However, their services were offered to BGen Stricker but they were declined.


Time Line and Event Log


--------------------------------------------------------------------------


Battle of North Point First Session

The game started at 14:30 and the session ended at 16:00, which was ten ten-minute turns. A very fast and efficient first session.

The American player (Paul G.) has opted to deploy as far forward as possible while utilizing the split rail fences for cover.


 The American right flank (left) is anchored by the 5th Maryland Regiment (arguably their best American militia infantry) while the Maryland Artillery are set up on the North Point Road. On the right two British skirmish lines face off against the Americans while trying to screen the rest of the British army coming up the North Point Road.


 The American second line of two battalions (center bottom and top) supported by the Maryland Cavalry Brigade (center left).


 A view of the MD cavalry (right) while the regulars (center top) are on the road to reinforce BGen Stricker's Brigade. The regulars are followed by the Virginian Brigade.  Paul G. was fortunate to roll for the regulars on his first try and the Virginians on the second try.


 A view of the British advance screened by the light companies and the 85th, who are mostly in skirmish formation.

 A view of the British artillery endeavoring to deploy on the road against the American artillery. 


 A view of the Royal and Colonial Marines with the RM Rocket detachment further away. The rockets were a victim of a double-six roll and lost two figures and were FALTERED.


The Maryland Rifles are in a firefight with the skirmishing 85th. So far the British are taking the brunt of the casualties, which is to be expected.

Wednesday 14 November 2018

Battle of Wolfe Island - Post Captain Rules

A couple of weeks ago I was fortunate to be invited to a game of Post Captain, which is a set of rules covering small unit naval actions of two or three ships per side. I wanted to secure some ship rules for a future Plattsburg Campaign that would require a small naval action. I have had my eyes on these rules for over a year. Further, I have being analyzing several Post Captain AARs through some excellent reports on TMP.  The following is one of those reviews.

Post Captain Rules Review from TMP


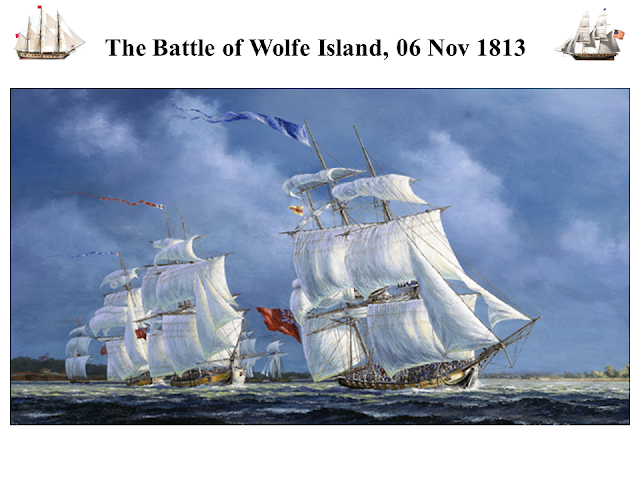
However, Russ' invitation was an opportunity to trial the rules first hand. About two weeks before the game Russ sent all of the players a historical background to the actions in the area of Wolfe Island. Although all the ships were in the Wolfe Island area, they never engaged in a fleet action.  Nonetheless, the historical background provided context to our what if scenario that could have occurred if both commanders were more aggressive. Here is that excellent presentation kindly provided by Russ.


The Post Captain Training Game 


The players were Russ (our host), Chris, Gord and myself.  Russ gave us a approximately fifteen brief on the rules with a view of getting to know them better while actually playing the game. Clearly Russ well well versed in the rules, which was reflected in his clear and concise rules brief.


More commentary to follow.

Friday 12 October 2018

Battle of Bladensburg - Second Edition

This is the second time I have played this most interesting battle. The participants were from the Duc de Fromage Group; Mike, Howard, Eric, Howard, Ed, Bruce and yours truly. One session was an all day event followed by two evening sessions over about two months. The battle was played from 1200 to 1620 hours, which is 27 turns.


The scenario was largely the same (see original scenario and constraints) as the previous game (see blog entry April 2018) ; the Americans had to prevent any British unit from exiting the table on the Washington Road and the reverse for British. The major British  constraint was that it could not have any Brigade rout. 


Contrary to some histories the aim of the British army and naval forces was not to destroy Baltimore as a major objective, rather it was  to opportunistically raid American towns and cities with extreme prejudice in the hope of drawing American troops away from the Canadian frontier.  Always in Ross' and Cochrane's thoughts was the efficacy of preserving the army for its ultimate objective, the taking of New Orleans.  Clearly and rightly in my view, Colonel Brooke's decision not to assault the Baltimore ramparts was a sound one that was consistent with army's ultimate objective.  Also, Vice Admiral Cochrane called off the bombardment of Fort McHenry, which was necessary to gain access to Baltimore harbor to support to the army.  So, this is the historical background that underpins the rationale for the game's British constraint.


As per all my War of 1812 games, General de Brigade (D) rules coupled with a growing addendum of War of 1812 caveats were used. The following photos and commentary represent the end state at 1620.


 After missing two opportunities at 1430 and 1500, the American's successfully roll  at 1600 for the arrival of the Virginia Brigade. Perhaps Col Minor used some physical persuasion to convince the supply clerk to finally issue the Virginians much needed muskets.


 Colonel Minor leading the Virginia Dragoons in a desperate attempt to bolster the American right flank.


 Also moving quickly to the vulnerable right flank are the two 12 pdrs and one 18 pdr of Barney's Flotilla Brigade.


 The aforementioned  American right flank with the Barney's Flotilla-men  on the left and facing them on the right is ever advancing 21st Fusiliers. The casualties are the remnants of two of Col Beale's Annapolis battalions that were routed and dispersed by the 21st.

Beale's Brigade is BROKEN, so it remains to the American sailors and marines to hold the fragile right flank until its guns can come to the rescue.


 An overview of the American right flank and the assault of the British Third Brigade supported by the naval contingent. Casualties were inflicted by the Maryland gunners (upper center right) on these two brigades as they advanced from the Bladensburg bridge. Fortunately, someone forgot to issue the American gunners with canister, otherwise the British casualties would surely have been higher.


 Having routed a Maryland battalion of Beal's brigade, the 2nd Royal Marines struggle to keep up with its fellow brigade battalion, the 21st. 


 The British artillery go their separate ways to engage the Americans. The three pounder (right) heads towards the bridge and the six pounder (bottom left) makes its way to the river with the hope of engaging the American right flank.


 Things are not going well on the British right flank, so, Major-General Ross gallops over to galvanize the First and 2nd Brigades. Alas, he is too late.


 The British 2nd Brigade hangs on in the face of American volley fire. Both the 4th and 44th have FALTERED and are now any easy target for an American charge. Where is the First Brigade? It is supposed to be right of the Second Brigade.


Ahh...this is why the 1st Brigade is no more. Canister fire to their front, volley fire to their left and Eric with at least three double six rolls ensured its demise. One of the DD6 rolls (risk to general chart) caused the death of the 1st Brigade's commander, LCol Thornton and then things went steadily bad for the British right flank (Howard). Howard was heard to say, ' what will they think of me back home' with  Bruce's instructions in ringing in Howard's head. At this point I declared an American victory as the British lost a brigade and must withdraw to the Fleet.


 The Maryland Cavalry Brigade are now eager to mop up the remnants of the British First brigade and charge the FALTERED 2nd brigade.


 A view of the American center. The Second Baltimore Regiment forming column of divisions in likely preparation to reinforce the collapsing right flank.


A close up of the 2nd brigade in its FALTERED state.


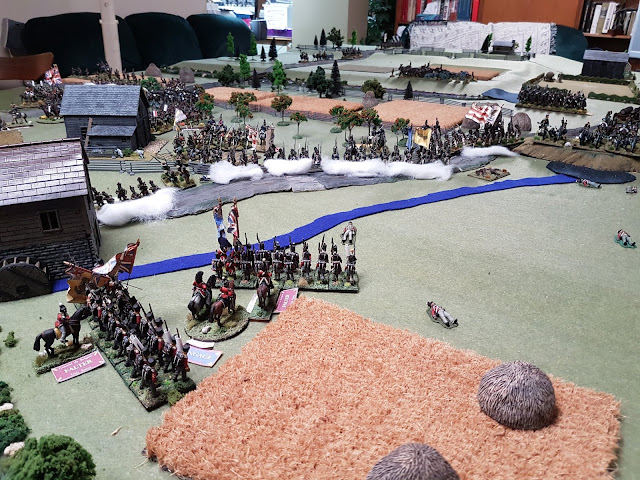
An overall view of the American left flank with the Georgetown Light Artillery on the far left and the British 2nd brigade mid upper right near the the mill.

A last view of the Bladensburg battlefield before I dismantle it to set up for North Point. I think everyone had a most enjoyable and interesting game.