Those Are Regulars!

Those Are Regulars!
Scott Leading the First Brigade

Friday 5 August 2022

Kentucky Militia at The Battle of New Orleans

Background to the Kentucky Militia Volunteers at new Orleans. 

Contrary to popular myth the Kentucky volunteers who volunteered to fight at New Orleans were not all equipped with the 'long rifle.' The minority (approximately a third) who were armed had muskets. As the result of a request of Major-General Jackson to the Kentucky Governor, a large contingent of poorly equipped and uniformed volunteers left Louisville on 21st November, 1814 under the command of militia Major-General John Thomas and his second Brigadier-General Adair. As they approached New Orleans Thomas became ill and Adair took command. Poorly provisioned this rag tag group floated down the Cumberland and Mississippi rivers in overcrowded flat bottomed boats with twenty-five of them dying along the way.

The Kentuckians arrived in a gaggle spread over several days from the 2nd to 4th January, 1815 now led by Adair.  Adair is described as looking like Reuben Kemper (a frontier backs woodman in the ilk of Daniel Boone and Davey  crocket)  "with his simple dress and rough and tumble look." Jackson appealed to Governor Claiborne to provide arm for the Kentuckians. Claiborne managed to secure 250 to 300 guns from the "Corps of Exempts" and the rest of the guns were a 'multiplicity of every description, caliber and antiquity' from local citizens.

Kentucky Volunteer Militia Uniforms.


This plate illustrates the Kentucky volunteers that participated in Harrison's 1813 campaigns leading to the The Battle of the Thames (Moravian town). Some of the New Orleans Kentucky volunteers would be dressed as above but most were not.


These Kentucky militiamen are equipped with rifles and the semi-official uniform of red trimmed frock coat in various shades of black and some faded as on the right.


This depiction of Kentucky Volunteers at the battle of River Raisin in January 1813 is getting closer to the rag tag appearance they wore at New Orleans.


This is the most realistic portrayal of the rag tag appearance of the Kentucky militia at New Orleans. The caption in the excellent Osprey booklet is worth quoting in its entirety.

"Many had no weapons, were shoeless, and dressed in rags. The citizens of New Orleans collected old clothing and fabric to clothe them against the bitter cold. The wealthier officer at far right wears the less expensive officer's uniform allowed by special regulations, a blue hunting shirt and trousers trimmed in red. His only rank badge is a red waist sash. The ragged infantryman at left wears 'frontier boots' simple moccasins and leggings of old cloth tied on with strings. The private at center wears a cloth skirt, coat cut from an old blanket, and is armed only with a knife and cudgel. These militia formations were armed with an assortment of scavenged firearms, and even farm implements collected from around New Orleans. Jackson used the Kentucky militia primarily as a reserve."

Clearly the the New Orleans Volunteers were not in the same class as the their brethren who fought under Shelby and Johnson on the Northwest Frontier. By way of a British football analogy, they were definitely fourth division gents.


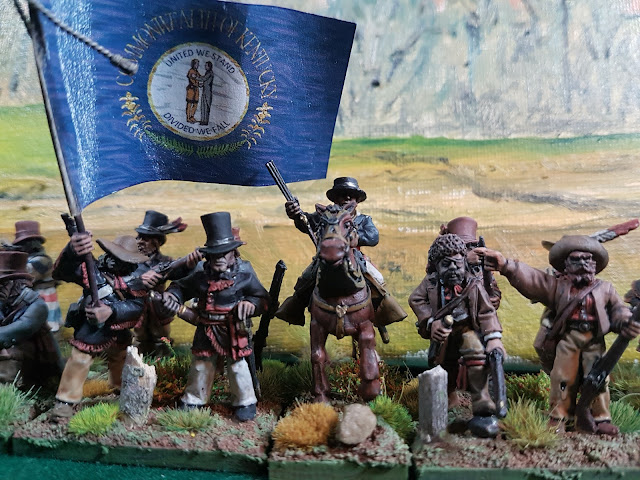
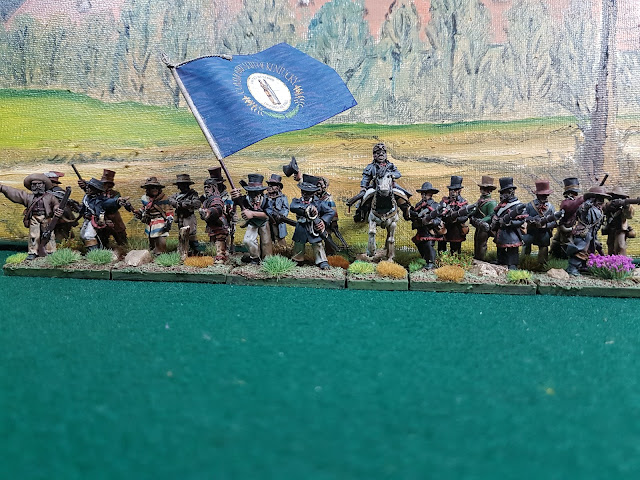
My depiction of the Kentucky Militia Volunteers at the Battle of New Orleans.

The figures are mostly Boot Hill, some North Star and a few Knuckleduster. This is the 13th Kentucky Militia Regiment commanded by Colonel Slaughter.


A close up of the 13th. The Kentucky stated flag is specially commissioned by Maverick Models. It is a bit too big but it will do. These Boot Hill figures are full of character and with a few rips and patches give a rag tag appearance. Note the variety of weapons from muskets to rifles and even shotguns.


The 14th Kentucky Volunteer Regiment with LtCol S. Parker commanding. Note the gents in the cloth coats. Most are wearing their civilian frontier garb with some wearing the traditional hunting shirt coat trimmed in red. 


A close up of the the 14th Kentucky Volunteers


References:
The Greatest Fury, by William C. Davis (IMHO the best and most detailed account of the battle)
Frontier Militiaman In The war of 1812: Southwestern Frontier, Osprey Warrior # 129.
Armies of the War of 1812, by Gabriel Esposito.
Years of Growth, 1796-1851: Military Uniforms in America, The Company of Military Historians.

Next: Louisiana militia artillery and Baratarian pirate gunners. 

---------------------------------------------------------------------------------


Unrelated to the subject is my recently completed depiction of a LCol. battalion commander of the 79th Cameron Highlanders. I am not a good tartan painter but I am pleased with this result using a combination of paint and micro pens. This mounted Front Rank figure along with the rebasing of figures, completes the battalion of highlanders figures that were painted by Mike. I am honored to have them.


Wednesday 20 April 2022

The First Battle of New Orleans - Second Phase

 The First Battle of New Orleans - Second Phase - 16 April, 2022 - Chez Schwager

We conducted the Second Phase of the First Battle of New Orleans at my place on Saturday 16 April, 2022. We (Rod, Paul, Eric and Bruce, again Howard could not attend) gathered at my place around 09:30 for a days gaming. Several days prior to the game each side was given a respective British and American options to conduct their tactical operations. Here are those options:


First Battle of New Orleans 23/24th December 1814 – Second Phase - British Options


Background: Your midday advance caught the Americans by surprise, and you were able to advance to the area around the Montreuil Plantation just a few miles from the city of New Orleans, which is your objective.


Option One: Sometime after dark commence a night attack on the Americans.
Advantages:
1.       Surprise, the enemy will not likely expect an attack so soon after the day battle.
2.       Open field to engage the Americans that gives the British force significant formation, discipline, and firepower advantages.
3.       The American ship’s firepower is less effective at night
Disadvantages:
1.       No reinforcements until late evening or early morning (you may fight with the units you have).
2.       All British units will still be reduced by one firing/morale factor to reflect their tiredness.
3.       A night attack will most likely be confused leading to heavy British casualties, some friendly fire, and possible negative impacts on morale.


Option Two: Rest the troops in place and await reinforcements (Second Brigade) that are expected to arrive in the late evening early morning. In the morning attack the Americans.
Advantages:
1.       The troops will be rested and ready to engage the Americans at full morale/firing strength.
2.       The army will be reinforced by the Second Brigade with additional artillery.
Disadvantages:
1.       The Americans will likely be able gather additional forces from N.O. or the Gentilly Plain to engage.
2.       The Americans may take time to adopt a defensive stance by erecting temporary fortifications making it more difficult for British forces to achieve their objective.


Option Three: Build a defensive mud and log wall.
Advantages:
  1. The opportunity to build a defensive mud and log wall during the night. This will take the frontal measurement of four or more battalions to complete a three to four-foot wall.
  1. This wall will significantly enhance your defensive capability (2 defensive pts).
Disadvantages:
  1. If building a wall during the night, British troops constructing the wall will be vulnerable to possible American attack.
  1. Already tired British units will be exhausted by morning incurring another decrease of a further one additional morale/firing factor. As an example, the 95th already reduced from Guard to Elite will drop further to Veteran. Similarly, the 4th dropped from Veteran to Line will drop further to 2L.
The British players chose Option Two: Rest in place and await reinforcements.


First Battle of New Orleans 23/24th December 1814 – Second Phase - American Options


Background: Even though your polyglot American army was caught by surprise, you were able to consolidate your various dispersed units to the area around the Montreuil Plantation just several miles from the city of New Orleans. To the surprise of the veteran British, you were able to blunt their advance and forced to them to retire. What will you do now?


Option One: Immediately commence a night attack on the British.
Advantages:
1.       Surprise, the tired enemy (-1 to firing) will likely not expect a night assault.
2.       Your troops are still fresh and eager after repulsing the British attack with little effort.
3.       It is likely that the smaller British army can expect further reinforcement during the late evening and following early morning. So, attacking immediately will nullify this British advantage.
4.       The Carolina is available for night operations.
Disadvantages:
1.       A night attack will most likely be confused leading to heavy American casualties, some friendly fire, and negative impacts on morale, particularly with the militia units.
2.       The Carolina’s enfilading fire will be less effective during night operations (-2 plus random targeting).


Option Two: Rest the troops in place and await possible reinforcements.
Advantages:
1.       The troops will be rested and ready to engage the British at full strength.
2.       The army will be reinforced with some additional artillery.
Disadvantages:
1.       You lose the initiative and possible element of surprise.


Option Three: Build a defensive mud, log, and barrel wall.
Advantages:
1.       The opportunity to build a defensive mud, log, and barrel wall during the night. This will take the frontal measurement of five or more battalions to complete a three to four-foot wall.
2.       This wall will significantly enhance your defensive capability (2 defensive pts).
3.       You may receive some artillery during the day.
Disadvantages:
1.       If building a wall during the night, American troops constructing the wall will be vulnerable to possible British attack. However, the risk is likely low as the British forces are extremely tired from their very long journey that was followed with a wearying battle.
2.       Most of the American units will be tired by morning (incurs a decrease of one morale factor). Conscript grade units that work the wall are not available to defend the line. These tired troops will camp to the rear of the army for twelve turns.

The American player, Eric, chose Option One: an immediate night attack with an approved addendum; the Louisiana militia units would remain at the western fence to build a log wall.

A reminder of where we are conducting this battle. The British Advance Brigade had landed at the mouth of Bayou Bienvenu on Lake Borgne (Point C), travelled the Bievenu then Bayou Mazant and finally the Villere canal to the Villere Plantation (Point A) with complete surprise. Without resting their troops (costing each unit a drop of one morale level) the British elected to press on to New Orleans.  Both the American and British armies met at the Montreuil Plantation (Point B) at approximately 1600 on 23rd December 1814. The Americans won the battle as they achieved their goal of defending their ground, while the British did not achieve any of their objectives.


Map, depicting the Plantations along the Mississippi and the route of the British Advance Brigade.


Shortly after having our coffees the British players, Paul and Bruce, were given the opportunity to rearrange their units for night time operations. The restrictions were; up to one battalion spread out by companies near the eastern plantation fence on picket duty with supporting companies just to the rear around campfires. The remainder of British had to be placed anywhere east of the most eastern fence on the table. Once the units were placed they were covered with sheets so that the American player, Eric could not discern the British intentions as he placed Jackson's army.

The losses, light though they were, are carried over from the previous game. Eric placed his army in an aggressive pose with the intent to immediately attack the British. As the British units have not had time to rest from the day's battle, they will continue to fight with a minus 1 to their unit morale. The big variable was how each side would fight in the confused arena of night operations.

We used the following table for nighttime movement and firing. Many thanks to Eric for allowing me to use his table and adapt it to this game.

Night Movement & Fire Table (roll 2D6 plus modifiers):

Conscript

2nd Line

Line/Veteran

Gd/Elite


2

2

2

2

Fire at nearest unit within arc

3, 4

3

3

3

Withdraw Half a Move

5, 6

4, 5

4

4

Halt (unless already retiring)

7, 8

6, 7

5, 6,

5

Oblique Left Full Move

9, 10

8, 9

7, 8

6, 7

Oblique Right Full Move

11, 12

10, 11, 12

9, 10, 11, 12

8, 9, 10, 11, 12

Normal move

+2 to above modifiers on road, path, fence, or along river/stream // -2 in woods, orchards or swamps


Additionally, when advancing on the enemy, to surprise sentries at night when visible (within 6” or 8” on fires)

Picket Attacked

Surprise D-10

Alarm Given D-10

First Picket

1 to 9

10

Second Picket

1 to 8

9 or 10

Third Picket

1 to 7

8, 9, 10

Fourth Picket

1 to 6

7, 8, 9, 10


Gun fire at Night -2 /  -1 if target is within 6” of a camp fire.


The following table illustrates the turn sequence of 10 minute turns, when possible reinforcements may arrive and the victory conditions/goals.

TURN SEQUENCE TABLE – FIRST BATTLE OF NEW ORLEANS – 23/24 DECEMBER 1814 – Second Phase

2100 No wind Dark no moonlight Visibility = 6”, 8” by fires

0000 93rd Highlanders Arrive

Roll D6 for arrival of 1st W.I. Regt. – 5 or 6

211O Roll D6 for arrival of Cannoniers 12pdr - 6


0010 Roll D6 for arrival of 1st W.I. Regt. – 5 or 6

          Roll D6 for arrival of 44th Foot – 6

2120 Roll D6 for arrival of Cannoniers 12pdr – 5 or 6


0020 Roll D6 for arrival of 1st W.I. Regt. – 4, 5 or 6

          Roll D6 for arrival of 44th Foot – 5 or 6

2130 Roll D6 for arrival of Cannoniers 12pdr – 5 or 6


0030 1st W.I. Regt. Arrives

          Roll D6 for arrival of 44th Foot – 5 or 6

2140 Roll D6 for arrival of Cannoniers 12pdr – 4, 5 or 6


0040 Roll D6 for arrival of 44th Foot – 5 or 6

          Roll D6 for arrival of 5th Coy R.A. – 6

2150

0050 Roll D6 for arrival of 44th Foot – 4, 5 or 6

Roll D6 for arrival of 5th Coy R.A. – 5 or 6

2200

0100* 44th Foot Arrives

Roll D6 for arrival of 5th Coy R.A. – 5 or 6

2210

0110  Roll D6 for arrival of 5th Coy R.A. – 5 or 6

2220


0120 Roll D6 for arrival of 5th Coy R.A. – 4, 5 or 6

2230 Roll D6 for arrival of 21st Fusiliers - 6

0130  5th Coy R.A. Arrives

2240 Roll D6 for arrival of 21st Fusiliers - 6

0140

2250 Roll D6 for arrival of 21st Fusiliers - 5 or 6

0150

2300 Roll D6 for arrival of 21st Fusiliers - 5 or 6

          Roll D6 for arrival of 93rd Highlanders -  6

0200

2310 Roll D6 for arrival of 21st Fusiliers – 4, 5 or 6

          Roll D6 for arrival of 93rd Highlanders - 5 or 6

0210

2320 21st Fusiliers Arrive

0220

2330 Roll D6 for arrival of 93rd Highlanders - 5 or 6

0230

2340 Roll D6 for arrival of 93rd Highlanders - 5 or 6

0240

2350 Roll D6 for arrival of 93rd Highlanders – 4, 5 or 6

          Roll D6 for arrival of 1st W.I. Regt. – 6

0250 end game on completion of turn.


British Victory if one American brigade is routed.

British Outstanding Victory if two American brigades are routed.

American Victory if American forces hold their position.

American Outstanding Victory if the British are forced to retreat.


The following photos and abridged commentary represents the conduct of the game.

Yours truly was assigned by Eric to command the regular brigade and the cavalry. With an Assault Order in hand, Colonel Ross (me) forged down the levee road looking for the British in 6" visibility. Fortunately, as the regulars were sticking to the road, for the present, so they did not have to use the Night Movement Table. 

Meanwhile, Eric with his Tennessee Mounted Gunmen (dismounted) along with Beale's Rifles, and the Choctaws in the swamp (shadowed by the gators) steadily moved over the fences up the center with changing vectors (night movement table) but generally towards the Americans. But where were the British? So far the Americans have only encountered the 95th pickets.


During the later half of the game, the rockets struck their fist target with a double six, which destroyed Beale's Rifles.


The curtain is  completely lifted (up until now the curtain was slowly rolled back in line with a visible American advance) as the American advanced units gets within sight of the British pickets. The main British camp is located in the south east corner of the table. A tempting target for artillery if they can get within the 6" visibility or 8" near a fire.


The American regulars (7th , 44th & 6pdr) have found some British pickets near the levee road and have driven them back towards the British camp. Hind's Mississippi Light Dragoons, U.S. LDs and the Feliciana Dragoons move up on levee road to support their infantry brethren.


Meanwhile the Louisiana Militia work on building the defensive wall at the western fence of the plantation. meanwhile Eric unsuccessfully rolls four times (between 21:10 and 21:40) and is unable to get the Creole Cannoniers with their 12pdr, from Governor Claiborne. This too bad as they look spiffy in their French Guard Artillery uniforms. Speaking of spiffy uniforms, Eric has the Plauche Battalion digging and building the wall with the other lessor militia units. Major Plauche is not happy that his unit is getting their colorful uniforms very muddy.


Brigadier-General Coffee (center) tries to control the chaotic Tennessean advance in the dark. Note that troops are allowed to move along the fence in normal movement without using the night movement table.


Emulating Eric's last game of finessing of reinforcement rolls, Paul successfully rolls at 2230 for the arrival of the 21st Fusiliers (upper right) on the first try (note the game started at 2100)! The US 7th (left) using the fence line, face off with the 85th L.I. while the US 44th (right) meet the 4th Foot. three turns later, Paul successfully rolls again and at the first opportunity gets the 93rd Highlanders.


Looking east to west. In the foreground left, the U.S.44th close with the 4th Foot, while the newly arrived 21st Fusiliers (right bottom) move up in support. In the center the U.S.7th exchanges fire with the 85th L.I. who are supported a R.A. 3pdr. The rocket battery and the 95th Rifles (mid right) fend off the Tennesseans at the fence line.


The Tennesseans continue to be subject to vagaries of the night table, (oblique right, backward, oblique left one turn, halt etc.) The Choctaws seem comfortable on the swamps edge (mid right) even though gators are gauging their every move..


Meanwhile, the Louisianans continue to build the wall and the Plauche battalion continue to grumble.


Near the British camp, the U.S. 7th has routed the rocket detachment while the Tennesseans (top left) close on the 95th.


Both the newly arrived 21st and the 93rd Highlanders turn to meet the First West Tennessee (center left) with Second W.T. just behind them to their left. The 95th (top right) line up to face the distant Third W.T. who are advancing to the fence line despite the chaos of the night table. The lucky U.S.7th (upper right) now down to four companies from six, move forward towards the Retreating 85th L.I. who are screened by the Royal Sappers and Miners.


The 4th Foot (bottom left) have about turned away from 44th who have Retreated of towards the levee, and moving to support the 21st Fusiliers (mid right). Hind's Mississippi Dragoons (upper center) move forward to threaten the 21st. While waiting for the 2 W.T,. to move away from the fence line, the First W.T. is taking heavy casualties against both the 21st and the 93rd Foot. The 3 W.T. (top center) is having difficulties moving in the dark. Major-General Keane's aide ( mid lower right) points to enemy cavalry silhouetted by camp fires and potentially moving towards the flank of the 21st Fusiliers.


The Feliciana Dragoons are sneaking up on the rear of the 4th Foot.


The 21st Fusiliers (foreground center) form line while to their right the 93rd Highlanders form a double line to face both the First and Second W.T. regiments (left center). The Sappers & Miners companies (top left) decided not to be sandwiched between the U.S. 7th and the Retreating 85th L.I. by hopping over the fence and ditch. However, this leaves the Retreating 85th exposed to a possible charge from the lucky U.S. 7th.


Well here is an unusual sight! The 4th Foot form square in the face of two American cavalry units near by (a wise decision).  Rather than face the musketry of a British square, Hind's Dragoons do an about face to reposition along the fence line. Behind them the U.S. Light Dragoons await an opportunity to pounce. The 3rd W.T. (upper left) gets another halt on the night table. The chaos of the night movement table continues.

At about this juncture both sides had to conduct brigade morale checks as per Routing units. Both armies were successful and the brigades carried on.


The US marine Company (upper left along fence) bravely face the 95th Rifles who are now in formed companies. What is this! The West Tennesseans have driven off the 93rd. A single company of the 93rd protects the rear of the battalion (off the table). Colonel Brooke (mid right) looks in horror as half of his brigade has Routed leaving a huge gap in the British line and the artillery crews exposed and isolated. A turning point of the game.


The brave and lucky U.S. 7th charge the Retreating 85th L.I., which automatically Rout! Another turning point.


The following photos and commentary represent the end state at 23:50 game time, when we had to end the game a bit early at about 5pm real time.

While the battle raged on at the British camp, the Mississippi Boatmen guard the plantation.


Still building the wall are the Louisianan militia. The wall will likely be ready for the next phase.


The U.S. 44th have long  recovered from their Retreat but are moving forward and backward as per the night table.


The 4th Foot remain in square protecting the British left flank  as American cavalry are still lurking in the area. The 21st Fusiliers have whittled down the First W.T. Regiment to three companies (and passed their morale check) but the Third W.T. (mid left) are coming to their rescue. Near them are the U.S. L.D.s who are supporting the US Marine company. The Second W.T. ( top right) are poised to charge the remnants of the R.A. 3pdr crew and horse team (off screen right).


Having seen off the 85th L.I., the lucky U.S. 7th must be extricated from this corner by the drunken Colonel Ross, who seems to oblivious to danger. As the a small company of the 95th fires on its flank, will the 7th pass its next Morale Check?


The British End State. The 95th are now cut off from their supply and command line and are will begin to run low on ammo and are subject to Morale Checks. However, the 21st Fusiliers are still in a good state facing the remnants of the First W.T. but are about to face a fresh Second W.T. regiment. Can they hold? Further, the right flank of 21st and the army is exposed and being penetrated by the Americans. The 4th Foot are in good condition albeit in square as American cavalry is still lurking in the area. Within a few turns, the 4th Foot will also have to face the U.S. 44th. The British if they have a lucky dice roll may receive the 1st West Indian Regiment in the next one to four turns. In the meantime the British Army is in a difficult position.


The American End State. The lucky U.S. 7th can turn and face the 95th but like the 95th are subject to a continuous Morale Check (50% > casualties). The U.S. 44th is in good condition and moving to engage the 4th Foot. All three units of American cavalry are in good condition and posing a threat to the British left flank. The First W.T. Regiment is tying down the 21st Fusiliers but in its much reduced state of three companies, it is unlikely to survive another Morale Check. However, the full strength Third W.T. Regiment will soon confront the 21st. The Second W.T. Regiment having recently driven off the 93rd Highlanders is in a position to cut off the Brits' supply line or turn right and fall on the flank of the 21st Fusiliers. Lastly, the Americans still have five battalions of Militia in reserve, although they cannot affect the immediate battle. Of note is the fact that the U.S.S Carolina had little impact on the game due the poor visibility, causing only a few British casualties near the campfires.


Meanwhile the Choctaws are still in the swamp keeping the gators at bay.

The Result

Clearly Jackson's Army has the momentum and could force another British Brigade Morale Check and inflict a possible British defeat. On the other hand, the British could receive the 1st West Indian Regiment reinforcement in the next one to four turns. Another four or five turns could have decided the outcome. Even though the game objectives favored an American victory, I ruled the tactical battle a draw.

BTW, it is Howard's fault. His unexpected table mat marketing visit killed about six turns, otherwise I am sure  we would have reached a culminating point.


I believe all players thought the game was a success and fun/interesting. I was particularly impressed with Eric's slightly modified Night Movement Table, which realistically imbued the game with unsuspecting movement chaos.


Next time; The Second Battle of New Orleans, the reconnaissance in force.