The Battle of Craney Island 22 June, 1813
As a prelude to the Battles of Bladensburg and North Point we have conducted the Battle of Havre de Grace and now we are starting Craney Island. (I still have more units to paint for Bladesnburg)
We are still using General de Brigade rules with an ever growing War of 1812 Addendum. The scale for the terrain is 1" = 20yds
Some background maps and research for the reader to consider if one wishes to game this battle.
Ref: Osprey Campaign Series 259 The Chesapeake Campaigns 1813-15.
Ref: Defending Norfolk by Stuart L. Butler
Orders of Battle Research
Battle Of Craney Island, 1813
British Order of Battle and Strength[i]
Commander Naval and Amphibious Forces - Rear-Admiral[ii]
Cockburn
|
Brigade
|
Regiment
|
M
|
F
|
Strength
|
Ratio
|
Uniform Details
|
Commanding Officer Land Forces– Colonel Beckwith (E) [iii] |
102nd
|
Foot
|
V
|
V
|
620
|
31 (32) +1
|
LCol Napier
|
2nd
|
|
V
|
V
|
800
|
40 (32) -8
|
|
I.C.F.
|
Independent Coy of Foreigners
|
L
|
L
|
300
|
15 (16)
|
SK
|
RA
|
3pdr field gun
|
E
|
E
|
|
1
|
|
RA
|
5.5” howitzer
|
E
|
E
|
1
|
1
|
|
RMA
|
Rocket Troop
|
V
|
V
|
1
|
1
|
|
|
|
|
|
|
|
|
Commanding Officer Amphibious Forces (1500) [vi]
–Capt (N) Pechell (several ship’s boats and launches carried 3pdr guns in their bows) |
Prov Bn
|
Royal Marines
|
V
|
V
|
842
|
40 (32) -8
|
|
RN
|
Sailor Landing Party
|
V
|
L
|
660
|
33 (28) -3
|
Lt Westphal
|
RMA
|
Rocket Boat
|
V
|
V
|
|
|
Lt Balchild
|
RN
|
Boats and launches
|
V
|
V
|
|
|
Boats with cannon = 3pdr
|
|
|
|
|
|
|
|
|
|
|
|
|
|
|
|
|
|
|
|
|
|
|
|
|
|
|
|
|
|
|
|
|
[i] 1812, Latimer, p309 for Brigade org
also Gleig’s Narrative p96-97 and Osprey’s The Chesapeake Campaigns p26 for numbers. Total for the ‘landing
force’ (102nd, Coy IF, 2nd Bn RM +Sailors) as 1,500 Lion In The Bay p. 66. Note the Osprey
OOB is wrong.
[ii] Interestingly, Cockburn was also a
Lieutenant-Colonel in the Royal Marines; Rockets Bombs and Bayonets, p20.
[iii] Sir Sydney was already established
as legend in the British army for his outstanding leadership of a Light
infantry brigade in the Peninsular War; Lion
In The Bay p60.
[iv] Two battalions of RMs each 842
strong, 300 men from the Bermuda Garrison, and two companies (300) of the
Independent Companies of Foreigners. Two companies of marine artillery and a
rocket ship provided heavy fire power. This strike force of over 2400 men was
commanded by Sir Thomas Beckwith.
[v] Swapped one 3pdr for one howitzer.
[vi] Quimby, p. 647; 1500 sailors and
marines.
[vii] In preparation for the Craney
Island, Admiral Cockburn had his sailors from two ships cut down 55 acres of
forest to build fifty flat bottomed landing craft or barges. With the newly
built barges and the fleet’s long boats LCol Beckwith could land 2,600 men in
one sortie. Each flat bottomed barge could carry forty troops or two pieces of
artillery plus twelve gunners; Lion In
The Bay p. 59. For the landing there were 30 ships boats and 15 flats, Lion In The Bay p. 66.
Battle of Craney Island, Research,
25 June,1813
US Order of
Battle and
Strength[i]
Area
Commander – Brigadier-General Taylor[ii]
Commanding
Officer Craney Island– Lieutenant-Colonel Henry Beatty (P)[iii]
DCO Major Waggoner (A)
|
Regiment
|
|
M
|
F
|
Strength
|
Ratio
|
COs & Uniform
Details
|
Infantry
|
LCol Henry Beatty (P)
|
4th Infantry (3)
|
Virginia Militia Regiment
|
C
|
C
|
|
26
|
Col Henry Beatty reinforced by Capt. Jesse Naille’s
det of the 5th Virginia Regiment[v]
|
3rd Rifles (1)
|
Virginia Riflemen (sk)
|
2L
|
2L
|
30
|
2
|
Capt. Thomas Robert + 3d Virginia Reg Rifles
commanded by Ens. Archibald Atkinson
|
20th Regt (1)
|
Regular Infantry(sk)
|
L
|
L
|
30
|
2
|
Capt. Pollard
|
Charlotte (1)
|
Light Artillery
|
2L
|
2L
|
|
4
|
Capt. John Richardson (gunners acting as infantry)[vii].
|
USMC (2)
|
Marine gunners as infantry
|
V
|
V
|
|
8
|
Lt Breckenridge (can be used as gunner
replacements)
|
|
Artillery
|
Craney Island
Batteries[ix] – Maj Faulkner
(A) Portsmouth
|
(Protected by log and sand breastworks)[x]
|
Portsmouth (2+2)
|
6 pdr guns
|
2L
|
2L
|
4
|
2
|
91 men
|
USN (3)
|
24 pdr naval guns
|
V
|
V
|
2
|
1
|
100 sailors Lt Neale
|
USN (3)
|
18 pdr naval guns
|
V
|
V
|
|
1
|
Gun captain -Master Rourk[xii]
|
|
|
|
|
|
|
|
|
[i] With arrival of sailors and marines
the grand total of gunners and infantry was about 700. The Chesapeake Campaign 1813-1814, Center of Military
History United States Army Washington, D.C., 2014,
by Charles P. Neimeyer; p 16.
[ii] One of the better American Militia
generals. He organized disparate companies into his regiments and appointed
field and company officers according to merit and competence ref Lion In The Bay p 58. See also Defending Norfolk by Stuart L. Butler.
(For game purposes BGen Taylor will be on the island).
[iii] In the face of what must have
appeared as an overwhelming array of British war ships and boats of a very
large amphibious force coupled with a land attack; LCol Beatty called for the
island’s colors to be struck. Major Faulkner’s argued vociferously that the
colors stay….and he won the argument. It appears that major’s Faulkner and
Waggoner effectively lead the defence of Craney Island. It appears LCol Beatty
was missing for the rest of the battle. Lion
In the Bay.
[iv] 466 + 46 sick, Lion in The Bay p 65.
[v] The Chesapeake Campaign 1813-1814, Center of Military History United
States Army Washington, D.C., 2014,
by Charles P. Neimeyer; p16.
[vi] Supposition. There were 91 light
artillery men present so, 11 to man the two six pounders leave 80 remaining
gunners as infantry.
[vii] The Chesapeake Campaign 1813-1814, Center of Military History United
States Army Washington, D.C., 2014,
by Charles P. Neimeyer; p 15, 16.
[viii] The Chesapeake Campaign, Osprey, p20. This Osprey uncharacteristically has many errors in the
orders of battles for Bladensburg and Northpoint, so, I suspect there are more
errors throughout. It is stated that the marines numbered 150. So, for this
scenario we will give the Americans the 150.
[ix] The Chesapeake Campaign 1813-1814, Center of Military History United
States Army Washington, D.C., 2014,
by Charles P. Neimeyer; p 15, 16.
See
also Quimby, p 645, for the confirmation of American artillery.
[x] Lion In The Bay, p66.
[xi] The Chesapeake Campaign 1813-1814, p 15 states only one 18 pdr vice two. Lion in the Bay, states two 18pdrs, p
[xii] He was the Captain of the
merchantman Manhattan and a former
member of the Virginia militia; note, that are several variations of the
surname; Lion In The Bay, p.
Scenario for The Battle of Craney
Island
Background
The
British attack on Craney island is a necessary prelude before they can execute
their main objective, which is the U.S.S.
Constellation and the Norfolk harbor.
The large British fleet has been blockading the Chesapeake area for
several months while also conducting periodic raids on American settlements. The
last major raid was Havre de Grace in May, which was an easy victory for
Rear-Admiral Cockburn. However, the attack on Craney island will be difficult requiring
significant coordination between land and amphibious forces. Complicating the
operation are the very shallow waters around Craney Island and the entrance to
the Elizabeth River, which is the access way to Norfolk. This shallowness will necessitate
the use of only shallow draft boats and barges.
The
American Perspective
You
are Brigadier-General Taylor commander of this Virginia district, which
contains Craney Island. American forces must defend the island to protect the Constellation and more importantly the
vital Norfolk harbor. Realising the importance of Craney island, Captain
Tarbell (Constellation) has
reinforced the Virginia militia with naval gunners and marines to man the large
naval guns. In the dim light of dawn, you observe much activity around the
British frigates and so you anticipate an amphibious attack. Accordingly, you
sent a mounted courier with a message to the Virginia governor, through asking
for additional reinforcements. Will these reinforcements arrive in time to
affect the outcome? It seems doubtful.
Intelligence. Local citizens have
advised that a large British force has disembarked on the mainland about two
miles north of Craney Island. The British soldiers appear to be heading for Craney
Island.
Considerations; the British attack from
the mainland across the shallows must be conducted when the tide is out as the
waters between Craney Island and the mainland will be shallow enough to permit
the land assault to wade across to the island. However, attacking at low tide
means that the amphibious assault will likely be conducted in shallow waters
with the risk of grounding. British boats grounding will present good targets for
the artillery.
- British boats will enter the area anywhere three feet from the eastern and or northern edges of the board.
- The Brtish player will declare the number of boats and from what direction they are coming from.
- Once the Britsh player makes the arrival declaration the boats are subject to American cannon fire.
- Each
gun port revetment has 6DFs.
- The
bridge can be crossed in single file (skirmish formation). A 3” penalty
for companies to form skirmish to cross the bridge and 3” to reform once
across.
The
British Perspective.
The
British objective is to seize Craney island with a view to using it as a staging
base for an attack on Norfolk and the
U.S.S. Constellation. To that end Vice-Admiral Warren has directed Rear-Admiral
Cockburn to lead a two-pronged assault on Craney island. The land assault will
be lead by the Peninsular veteran Col Sir Sydney Beckwith and the amphibious
assault will be lead by Captain (N) Pechell assisted by Captain (N)
Hanchette. The land element will be
landed north of Craney Island at first light and proceed directly to the
island.
Problem; the attack must be
conducted when the tide is out so that the waters between Craney Island and the
mainland will be shallow enough (0-3Ft) to permit the land assault to wade
across to the island. However, attacking at low tide means that the amphibious
assault will be conducted in shallow waters with the risk of grounding.
- British
boats will enter the area anywhere three feet from the eastern and or
northern edges of the board. The British player will declare the number
boats and from what direction. Once the British player makes this
declaration the boats are subject to American gun fire.
- The
British player may divide his amphibious force into two groups before
starting.
- British
may cross shallow water (3” per turn) in any formation but suffer a -1 for
firing and melee.
- The
bridge can be crossed in single file (skirmish formation). A 3” penalty
for companies to form skirmish to cross the bridge and 3” to reform once
across.
Extracts from War of
1812 Addendum Rules Version 5 (new or revised) that are likely applicable to this Scenario.
Shallow waters/swamps (less than four feet): 3”
regardless of formation.
Redoubts/Field Fortifications/Buildings Defence Points (16.5 amplifies):
- Field
Fortification for one gun (stone wall earthen and log, gabions etc)
defence value 6 to 8
defence points – Target factor -1,
Melee defence factor +1. Craney Island has sand and log
revetments and are valued at 6DPs.
- Targeting
Sequence versus Redoubts/Field Fortifications/buildings/boats:
- The attacker uses the artillery table
to calculate gun crew casualties.
- For
each enemy salvo that cause casualties, the defender rolls 1D6 to determine the redoubt/fort damage;
i.
1 - 2 = no
damage,
ii.
3 - 5 = 1 def
pt destroyed,
iii.
6 = 2 def pts destroyed.
Note 1:
attacking artillery does not have to score casualties to force the defender to
roll a 1D6 for possible damage…each salvo incurs a defender D6 damage roll.
- Attacking
artillery causing no casualties defender
rolls 1D6;
i.
1 - 2 -3 = no
damage,
ii.
5 = 1
def pt destroyed,
iii.
6 = 2
def pts destroyed.
Note 1:
Structures that are destroyed destroy any troops that occupy them.
Note 2:
Stone Redoubts and Forts can only be attacked by heavy artillery (18pdr and
24pdr guns and carronades) at effective
range or less. Does not apply to heavy howitzers 8” or heavy mortars 10”.
Note 3:
Light fortifications, earthen redoubts and buildings can be engaged by field
artillery at effective range or
less. Does not apply to howitzers or mortars.
Gun-boats/boats:
- Movement
= 12” - upstream = 6”
- Up
anchor to prepare and sail = ½
turn
- Up
anchor and prepare to row = ½ turn
- Reposition
boat for firing = 1 turn
Boat Loads:
1. Max load
small boats = four figures or gun crew.
2. Max load
large boat= eight figures or a gun and limber and horse team.
3. Load/unload
time from dock = half turn.
4. Load/unload
time from beach/boat (shallow water) = one turn. (no impact
on formation integrity)
5. If any boat
loaded with troops loses its defence points = boat destroyed and troops KIA.
- When boats enter a shoal area at normal speed,
they must immediately roll 1D6 and consult the following table:
- 1 = grounded/hit rocks boat overturns and troops
are injured or drowned (sailors/marines swim for nearest shore) Roll 1D6 for KIAs; 1-2 = 1KIA 2-3 = 2KIA, 5 = 3KIA 6 = 4KIA.
- 2 = grounded no movement.
- 3 = move 6” (or remaining movement not >6”)
then grounded.
- 4, 5, 6 = no restriction.
Boat Movement in Shoals/Shallow Waters Slow Speed 6”:
- When
boats enter a shoal area at slow speed, they must immediately roll 1D6 and
consult the following table:
- 1 = grounded/hit rocks boat is damaged and troops
(unformed) abandon the boat.
- 2 = grounded no movement.
- 3 = move 3” (or remaining movement not >3”)
then grounded.
- 4, 5, 6 = no restriction.
Gunfire: Boat to Shore – Shore to Boat:
- Field
artillery targeted by gun-boat (when moving) target modifier = -1 to target modifiers.
- Boat
target (moving) by field artillery target modifier = -1, stationary 0. Gun
Boat 4 to 6 defence points (weak fortification - para16.5).
- Long
Boat 2 defence points.
- Row
Boat/York boat = 1 defence
point.
- For
each enemy salvo, the defender rolls 1D6 to determine the boat damage as
per artillery damage sequence above. {defence
points may be modified slightly dependent upon the scenario requirements}:
The Game Orders of Battle
Battle Of Craney Island, 25 June, 1813
British Order of Battle and Strength
Commander Naval and Amphibious Forces - Rear-Admiral
Cockburn (E)[5]
|
Brigade
|
Regiment
|
M
|
F
|
Strength
|
Ratio
|
Uniform
Details
|
Commanding
Officer Land Forces– Colonel Beckwith (E) [1] *enter any southern land edge of the board.
|
102nd
[4]
|
Foot
|
V
|
V
|
620
|
32
|
LCol Napier
|
2nd Bn
[4]
|
Royal
Marines
|
V
|
V
|
800
|
32
|
Maj
Malcolm
|
I.C.F. [2]
|
Independent
Coy Foreigners
|
L
|
L
|
300
|
16
|
SK
|
RA [2]
|
3pdr field
gun
|
E
|
E
|
3
|
1
|
|
RA [2]
|
5.5”
howitzer
|
E
|
E
|
1
|
1
|
|
RMA [2]
|
Rocket
Troop
|
V
|
V
|
1
|
1
|
|
*Amphibious forces may enter game
area three feet from any eastern or southern edge of the board where they may
be targeted by U.S. guns.
|
Commanding
Officer Amphibious Forces (1500)–Capt (N) Pechell (E) [1] May separate into two groups. Boats
must keep within 6” of each other.
|
1st Bn [4]
|
Royal
Marines
|
V
|
V
|
842
|
32
|
LCol
Williams
|
RN [4]
|
Sailor
Landing Party
|
V
|
L
|
660
|
28
|
Lt
Westphal
|
RMA [2]
|
Rocket
Boat (4DF)
|
V
|
V
|
|
|
Lt Balchild
|
RN [2 x 4]
|
Armed
Boats 3 pdr (3DF)
|
V
|
V
|
|
|
|
RN [1 x 10]
|
Launches/barges
(1DF)
|
|
|
|
|
|
Battle of Craney Island, 25 June,1813
US Order of Battle and Strength
Area Commander – Brigadier-General Taylor (E) [5]
Commanding Officer Craney Island– Lieutenant-Colonel
Henry Beatty (P)
DCO Major Waggoner (A)
|
Regiment
|
|
M
|
F
|
Strength
|
Ratio
|
COs & Uniform
Details
|
Infantry
|
LCol Henry Beatty (P) [1]
|
4th Inf [4]
|
Virginia Militia Regt
|
C
|
C
|
512
|
26
|
Col Henry
Beatty reinforced by Capt. J.Naille’s det of the 5th Virginia Regiment
|
3rd Rifles [1]
|
Virginia Rifles (sk)
|
2L
|
2L
|
30
|
2
|
Capt.
Thomas Robert + 3d Virginia Reg Rifles commanded by Ens. Atkinson
|
20th Regt [1]
|
Regular Inf. (sk)
|
L
|
L
|
30
|
2
|
Capt.
Pollard
|
Charlotte [1]
|
Light Artillery
|
2L
|
2L
|
?80
|
4
|
Capt. John
Richardson (gunners acting as infantry)
|
USMC [2]
|
Marine gunners as inf.
|
V
|
V
|
50 (150)
|
8
|
Lt
Breckenridge (can be
used as gunner replacements)
|
|
Artillery
|
Craney
Island Batteries– Maj Faulkner (A) [1]
|
(Protected
by log and sand breastworks (6DF for each gun position)
|
Portsmouth
(2+2) [4]
|
6 pdr guns
|
2L
|
2L
|
4
|
2
|
91 men
|
USN [3]
|
24 pdr
naval guns
|
V
|
V
|
2
|
1
|
100
sailors Lt Neale
|
USN [3]
|
18 pdr
naval guns
|
V
|
V
|
1
|
1
|
Gun
captain -Master Rourk
|
Battle of Craney Island 25 June, 1813 Time
Record Chart
|
|
|
|
|
|
|
|
|
|
|
|
|
|
|
|
|
|
|
|
|
|
|
|
|
|
|
|
|
|
|
|
|
|
|
|
|
|
|
|
|
|
|
|
|
|
|
|
|
|
|
|
|
|
*Possible U.S.reinforcements
|
** Things going
badly for Americans.
|
The Battle of Craney Island
First Session Thursday 7 September, 2017
The following photos represent the end state after the completion 0650 or turn six.
Crews of the USS Constellation man the 24 pounder while Major Faulkner directs them to fire on one of the British columns.
A view of Col Beckwith's land forces with the Royal Marines in the forefront center and the 102nd on the marines right. In the back ground center left, the ICF has pushed back American skirmishers. However, it has unexpectedly come into contact with 4th Virginia regiment. The placement of small unit skirmishers to slow Beckwith's advance was a clever move. However, placing neartly all of the American infantry to also slow down the british advance is an audacious move. Will it pay off or will turn into a pyhric delay? The result of the next melee will likely tell.
A view of Craney Island facing south. Only the 24 pounder has been revealed. Who knows what other units are lurking under those markers.
A view facing south with the ICF skirmishing with the 4th Virginia. The RMs charged the 4th Virginia while they were in a vulnerable state (almost a flank attack). Incredibly, the American militia regiment secured a draw against the marines. The 102nd can only look on as their marine brethren are engaged in melee.
The RA 3 pounder and the RMA rocket team are endeavouring to get into action. However, they seem to be boxed in by the infantrry and the howitzer.
The area around Craney Island is quite quiet except for the occasional boom of the naval 24 pounder. Where is the expected British amphibious attack? They seem to be milling around off shore outside the the 24 pounder's range. Is this an unusual tactic or part of Rear-Admiral Cockburn's overall cunning plan? Stay tuned for the possible answer at Session Two.
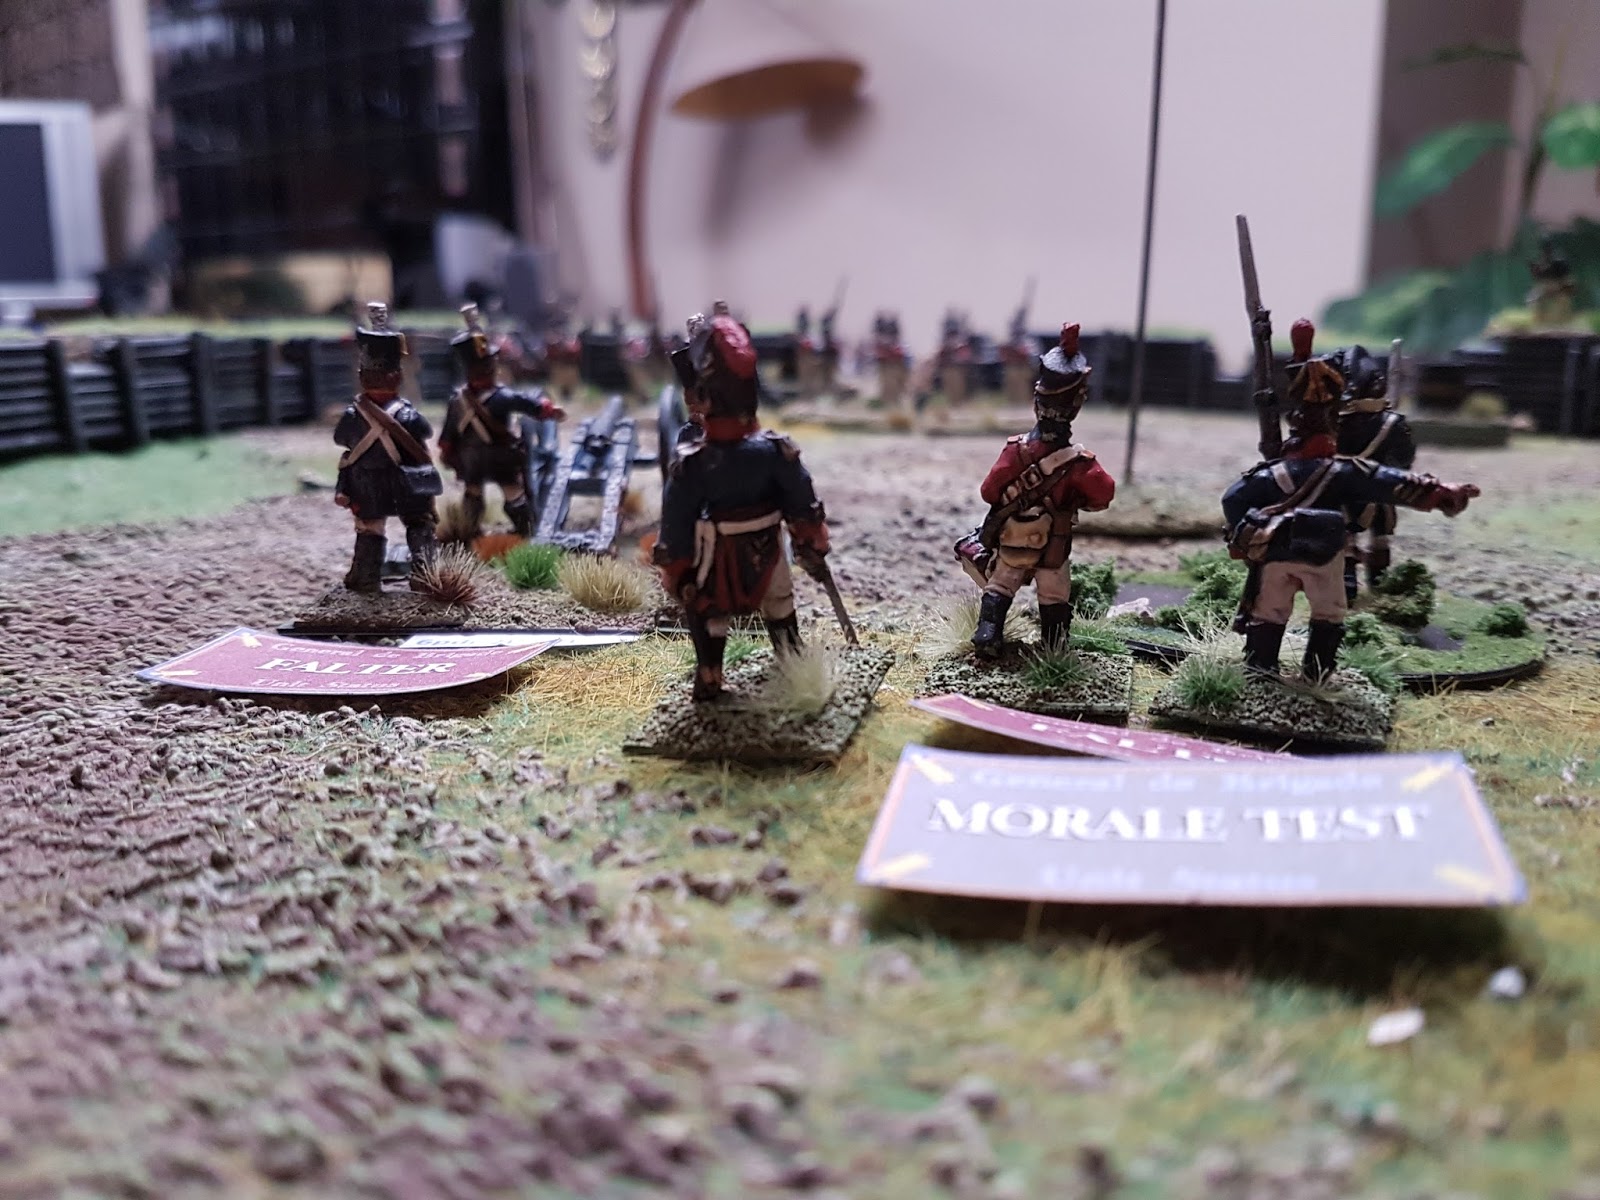
 The First battalion of Royal Marines having suffered at least three failed morale checks in RETREAT, finally passing and then waiting one more turn in the UNFORMED state, is now ready to resume the ASSAULT. But alas it is too late to affect the outcome.
NOTE: around the second turn, the British Amphibious forces lost another two boats and a gun-boat, which forced a British Army FALTER point check. Surprisingly, it failed and Steve and Paul M.. were declared the victors. However, as the evening was young, we decided to play the game through as if the British had passed the check.
The First battalion of Royal Marines having suffered at least three failed morale checks in RETREAT, finally passing and then waiting one more turn in the UNFORMED state, is now ready to resume the ASSAULT. But alas it is too late to affect the outcome.
NOTE: around the second turn, the British Amphibious forces lost another two boats and a gun-boat, which forced a British Army FALTER point check. Surprisingly, it failed and Steve and Paul M.. were declared the victors. However, as the evening was young, we decided to play the game through as if the British had passed the check.